

WordPress is one of the widely used Content Management System even after some user finds hard to integrate new features that are beyond the scope of Plugins, but still they are using WordPress happily. Nowadays, every one wants advance features and different services on their blog and the website that can be achieved either using paid-premium plugins and themes or by adding a piece of PHP snippet to the theme’s function file or creating a totally different plugin.
In this article, we will learn to add PayUMoney Payment Gateway to the WordPress followed by the complete and detailed tutorial to integrate or link the PayUMoney Payment Gateway with the Fast and Secure Contact Form plugin also known as FS Contact Form (FSCF) and that’s without using any plugin — it’s all free!
Before we begin you must get your “Merchant key” and the “Merchant Salt” from the PayUMoney. For those who don’t have applied for the PayUMoney Payment gateway can apply from payumoney.com. In order to apply for the PayUMoney payment gateway account, you need to submit the following details and documents while creating an account on the PayUMoney:
- E-mail address
- Mobile Number
- Bank details (Bank Name, A/c number, Branch, IFSC Code etc.)
- PAN Card
- Deed Certificate (needed for registered firms and optional for the individual accounts)
Once you are ready with “Merchant key” and the “Salt” key you can continue further with this article towards linking FS Contact Form with PayUMoney account.
There are two ways to integrate PayUMoney payment gateway with WordPress Fast and Secure Contact Form plugin:
- Using PayUMoney button — May not be suitable for the dynamic amount
- Using PayUMoney API — Supports dynamic amount
We have covered the both methods which include integrating with FS Contact Form using PayUMoney payment buttons and API (Application Programming Interface).
First, we’ll learn to integrate the PayUMoney payment gateway with WordPress FS Contact Form.
Things you will need to integrate the PayUMoney payment gateway with WordPress FS Contact Form:
- PayUMoney Merchant Key
- PayUMoney Merchant Salt
- PayUMoney PHP API library
The Merchant Key and the Merchant Salt can be found in your PayUMoney Sellers account. To get the Merchant Key and the Merchant Salt:
- Login into your PayUMoney account
- From the top right corner, click on your “Account” that may be named as “Your Name” or “Your company name” and under the menu click on the “Seller Dashboard” option
- On the “Seller Dashboard” page Click on the “Account Details” option located in the left sidebar.
- On the “Account Settings” page, click on “My account” and under “My account” click on the “Merchant-Key Salt” tab. Alternative to this, you can follow this link to land directly on the “My account” page.
The Merchant-Salt key page contains following details:
- Merchant ID
- Merchant Key
- Merchant Salt
Where we only need “Merchant Key” and “Merchant Salt” for integrating PayUMoney payment gateway with FS Contact Form.
Once you are ready with Merchant key and the Merchant salt, the next step is downloading and configuring the PayUMoney PHP Payment Gateway API known as “PayUMoney PHP Module” that you can download from github.com uploaded by the PayUMoney developers.
The PayUMoney PHP Module contains 5 files as :
- PayUMoney Technical Integration Document.pdf
- PayUMoney_form.php
- PayUMoney_logo.png
- failure.php
- success.php
Where we will be using only “PayUMoney_form.php”, “failure.php ” and “success.php”. Now, follow the below steps to configure the PayUMoney PHP Module.
Step #1 Replacing Merchant key and Merchant salt
In the “PayUMoney_form.php” replace $MERCHANT_KEY, $SALT and $PAYU_BASE_URL with your Merchant key and Merchant salt and $PAYU_BASE_URL as https://secure.payu.in so, the final lines of PayUMoney_form.php would be:
<?php
// Merchant key here as provided by Payu
$MERCHANT_KEY = "YOUR-MERCHANT-KEY";
// Merchant Salt as provided by Payu
$SALT = "YOUR-MERCHANT-SALT";
// End point - change to https://secure.payu.in for LIVE mode
$PAYU_BASE_URL = "https://secure.payu.in";
....
....
https://secure.payu.in instead of https://test.payu.inAfter PayUMoney_form.php the next step is replacing the Merchant salt in the “success.php” and “failure.php“. In the both files, just replace the $salt="GQs7yium"; with your merchant salt.
Once you have replaced the merchant key, merchant salt and base URL in PayUMoney_form.php and merchant salt in the success.php and failure.php the next step is creating a custom PHP file to handle the “$_GET” request that we will request/send through FS Contact Form.
Here is the PHP sample code to handle the FS Contact Form $_GET request and transfer it further to PayUMoney Payment API/ Module.
Create a PHP file and name it as “payu-api.php” and add the following PHP code to it and save it.
<?php
header("Cache-Control: no-store, no-cache, must-revalidate, max-age=0");
header("Cache-Control: post-check=0, pre-check=0", false);
header("Pragma: no-cache");
$MERCHANT_KEY = "YOUR-MERCHANT-KEY";
$SALT = "YOUR-MERCHANT-SALT";
$txnid = substr(hash('sha256', mt_rand() . microtime()), 0, 20);

$fixed_amount=''; //Enter a fixed amount if you want
if(empty($fixed_amount))
{ $amount=$_GET["amount"]; } else { $amount=$fixed_amount;  }

$one_product=""; //mention the product if you have single product
if(empty($one_product))
{ $amount=$_GET["productinfo"]; } else { $productinfo=$one_product; }
$success_url="https://example.com/payumoney/success.php"; //Replaced with your domain/path
$failure_url="https://example.com/payumoney/failure.php"; //Replaced with your domain/path
?>
<!doctype html>
<html>
<head>
<script>
function submitPayuForm() {
document.getElementById("myForm").submit();
}
</script>
</head>
Please wait...
<body onload="submitPayuForm();">
<form action="PayUMoney_form.php" name="payuForm" id="myForm" method="post">
<input type="hidden" name="key" value="<?php echo $MERCHANT_KEY;?>" />
<input type="hidden" name="hash" value="<?php echo $hash;?>"/>
<input type="hidden" name="txnid" value="<?php echo $txnid;?>" />
<input type="hidden" name="amount" value="<?php echo $amount;?>" />
<input type="hidden" name="firstname" value="<?php echo $_GET["firstname"];?>" />
<input type="hidden" name="email" id="email" value="<?php echo $_GET["email"];?>" />
<input type="hidden" name="phone" value="<?php echo $_GET["phone"];?>" />
<input type="hidden" name="productinfo" value="<?php echo $productinfo;?>">
<input type="hidden" name="surl" value="<?php echo $success_url;?>" />
<input type="hidden" name="furl" value="<?php echo $failure_url;?>" />
<input type="hidden" name="service_provider" value="payu_paisa" />
</form>
</body>
</html>
Once you are ready with payu-api.php the next step is storing these files in a directory which you can keep as per your choice, but make sure to replace the $success_url and $failure_url in the payu-api.php file.
Well, you have successfully configured the PayUMoney Payment API and it is now ready to accept the payments, but we have still left with the FS Contact Form. Before we create the FS Contact Form to accept the payment and the other details from the users, there are few things which you should keep in mind while creating the form. Basically, in order to process the payment, we need following details from the users:
- Name of the user
- E-mail address
- Mobile Number
- Amount (needed only in case of dynamic amount/ payment)
Which means, the above mentioned fields should be mandatory in the FS Contact Form. So, lets begin with creating the FS Contact form for PayUMoney.
To create the FS Contact Form to accept payment or money from the users through PayUMoney:
- Download and activate the FS Contact Form if in case you’ve not installed it on your WordPress website.
- Once you have installed, Go to “Settings” from the WordPress dashboard and under the “Settings” click on “FS Contact Form“.
- On the Fast Secure Contact Form Settings create a new Form or you can use the existing one if in case you have already created one.
- Add the fields as per your requirements, but make sure to add “Name”, “Email” and “Mobile” fields while you can also have Amount field if in case of dynamic amount and if in case of fixed amount you can define the amount in the “payu-api.php” file.
After designing and creating the FS Contact form as per your requirement, click on the “Advanced” tab on the “Fast Secure Contact Form Settings”
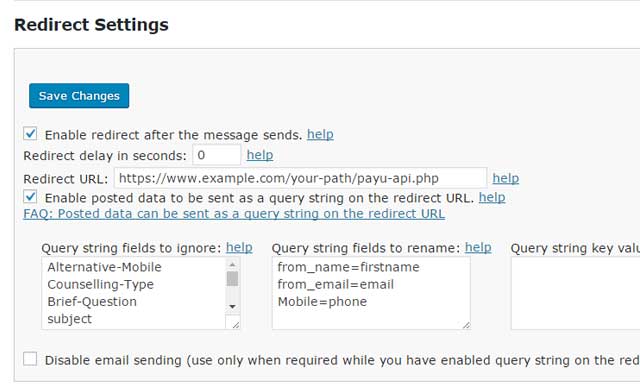
Under the “Redirect Settings” section :
- Enable the “Enable redirect after the message sends”
- Enter the full URL of the “payu-api.php” file in respect to your domain/website
- Enable “Enable posted data to be sent as a query string on the redirect URL”
- Add all the field in “Query string fields to ignore” except the fields which contains name, email address and the mobile number (also amount field if in case you have specified and dynamic amount is needed)
- In the “Query string field to rename” field replace and enter the following lines :
YOUR-FORMS-NAME-FIELD=firstname
YOUR-FORMS-EMAIL-FIELD=email
YOUR-FORMS-MOBILE-FIELD=phone
Where, following field are optional:
YOUR-FORMS-AMOUNT-FIELD=amount
YOUR-FORMS-PRODUCT-NAME-FIELD=productinfo
After replacing the above mentioned values, click on the “Save changes” button to apply the settings and your website is ready to accept the payments.
Final touch, in the file PayUMoney_form.php you may see unnecessarily fields which could be a bit messy to see, that you can hide by adding following CSS code in the PayUMoney_form.php before </head> section.
<style>
 body{
 display:none;
 }
 </style>
I’m personally using this PHP snippet and method and if in case you are having any issue while implementing this method you can let us know in the comment below. In addition to this, we also offer Premium support for which you can apply from Premium Counselling & Support.
Now, moving ahead, the next step is accepting payment using FS Contact Form and PayUMoney Payment button which is one of the easiest method.
To integrate PayUMoney payment button with FS Contact Form:
- Generate the Payment button from the PayUMoney seller’s dashboard.
- Copy the payment destination URL from the PayUMoney Payment button embed code.
- Go to “Advanced” option of the FS Contact Form and within the “Redirect Settings” section Paste the Payment destination URL and make sure to Enable ” Enable redirect after the message send” option and click on the “Save changes” button to apply the settings.
That’s all folks, your comments and suggestion will be appreciated in the comment. For those who are facing any issue in implementing and integrating PayUMoney with FS Contact form you can always let us know.
