On today’s date, almost every television (TV) manufacturer offers a plug-and-play feature through USB, commonly referred to as a “pen drive,” “flash drive,” and so on. Many of you might have already started using your external hard disc drives to watch the latest movies that you may have purchased or downloaded from various free and paid websites.
Anyway, setting that aside, let us focus on the topic. So, most of the TV sets which are now commonly known as LCD and LED TVs have the following issues:
- Device Not supported
- Media Format Not Support
- Video Cannot Be played
- Too large images
In this post, we are going to address all these issues with simple steps, and you don’t need much technical knowledge, as we are here to explore everything in the simplest way possible, bringing it down to earth. So, let’s begin one by one.
Fixing “Device Not Supported” Problem
No matter whether you are trying to play a media file from your pen drive or the external hard drive, the problem is the same with all these portable devices. Most of you might be encountering the “Device Not Supported” issue with your TV sets and the USB stick. Well, there is nothing wrong with either of them. The problem lies with the format of your pen drive, which you need to fix. In technical terms, there are three basic drive formats, as follows:
- FAT32 – FAT32 stands for “File Allocation Table 32-bit.” It is a file system format used to organize and store data on storage devices such as USB drives, memory cards, and external hard drives. FAT32 is known for its wide compatibility across different operating systems and devices, making it suitable for sharing files between various platforms. However, it has limitations on individual file size and partition size, making it less suitable for large files and modern storage requirements.
- NTFS – NTFS stands for “New Technology File System.” It is a file system format developed by Microsoft and is commonly used in modern Windows operating systems. NTFS offers several advantages over older file systems like FAT32, including improved security, support for larger file sizes and partitions, better data reliability, and more advanced features like file encryption and access control. It is well-suited for large-capacity hard drives and provides efficient file management capabilities for modern computing needs.
- exFAT – exFAT stands for “Extended File Allocation Table.” It is a file system format developed by Microsoft as an extension of FAT32. exFAT is designed to overcome the limitations of FAT32, providing support for large file sizes and storage devices. It is optimized for use in flash drives, memory cards, and external hard drives, making it an ideal choice for exchanging data between different devices and operating systems. exFAT offers better compatibility and performance compared to FAT32, especially for larger files and modern storage solutions.
Approximately 90% of TV sets with USB support are compatible with FAT32. This implies that there are higher chances that your TV supports the FAT32 format rather than NTFS and exFAT. To resolve this issue, you simply need to quickly check which type of format your TV set supports, either from the manual book or the Internet. In case you are unsure, we highly recommend changing the format of the drive to FAT32. The steps are provided below:
- Warning! Take a backup of your pen drive before performing formatting.
- Plug the pen/hard drive into your PC using a data cable.
- Go to “My Computer” (in Windows 7, 8, and 10, it may be named as “YOUR-NAME PC” or just “This PC”).
- Open the drive that belongs to your pen/hard disk drive.
- Copy all the files to avoid data loss (create a backup).
- Paste it to a different drive or the desktop.
- Once you have finished backing up your data, return to My Computer.
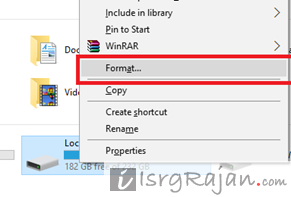
- Right-click on the drive and select the “Format” option.

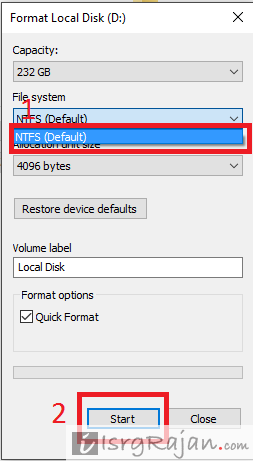
- Select “NTFS” under the File system option.

- After selecting the NTFS file system format, click on the “Start” button and wait until the process finishes.
Fixing “Media Format Not Support” and “Video Cannot Be played.”
Most TV sets do not support the latest and advanced video formats such as .mp4, .mov, .mk, .mpeg, etc. Instead, they typically support the .avi format. Audio Video Interleave (AVI) is commonly used by DivX and PCs, and it has become a popular format supported by many USB-enabled TV sets. This means that you will need to convert your video files to .avi format in order to play them on these TVs.
Converting video files (e.g., mp4, MOV, etc.) to .avi can be done through various methods. We recommend using the YouTube Video Download tool (YTD) from ytddownloader.com, which comes with an inbuilt video conversion option. YTD allows you to easily download videos from YouTube and other platforms, and it also enables you to convert the downloaded files to the desired .avi format, making it compatible with your TV.
By using YTD, you can enjoy your favorite videos in the .avi format and watch them seamlessly on your USB-enabled TV without worrying about compatibility issues. Remember to follow the conversion process correctly to ensure smooth playback and an enjoyable viewing experience.
Fixing “Too large images” and photo files
our TV set may not support files larger than 3 megabytes (MB). In such a situation, you need to reduce the file size, and to accomplish this, you have access to numerous free and paid software options that offer good quality results. Here are some of the available choices:
- Adobe Photoshop – This program provides an intuitive interface and allows you to easily resize your image files while maintaining good image quality. It offers a free version with basic features and a premium version with additional functionalities.
- Microsoft Office Picture Manager or Windows Photos – Known for its advanced compression algorithms, this software efficiently reduces image file sizes without compromising image clarity. It offers both a free trial and a premium version with extended features.
- birme.net – A user-friendly tool that offers various image compression options, allowing you to customize the level of compression as per your requirements. The free version provides basic features, while the paid version offers more advanced settings.
Remember to choose a software solution that suits your specific needs and provides the desired output quality. With these tools at your disposal, you can easily resize and optimize your image files to make them compatible with your TV and enjoy your media content hassle-free.

